
-
RNS-510 HDD replacement/SSD swap DIY
This is kind of old, but from what I know, it was never well documented. Well, it wasn't back in June 2010 when I first did it, but I haven't looked since. I offered to do 2 of them for some mates, so I figured I could post the DIY up now with some decent, and rather idiot proof instructions. It's not a difficult process at all. I undertook it based on vague directions, but all you really need to know is that you have to pretty much strip the whole unit down to access the HDD.
The access times are considerably better than the standard HDD. With a full 40GBs of albums and folders, it would scroll and navigate without delay. My unit has been running flawlessly for over the past year.
Before I start
I accept no responsibility if you end up with a non-working unit. If your unit is still under warranty, and you undertake this procedure, it will no longer be covered by that warranty. You've been warned. 
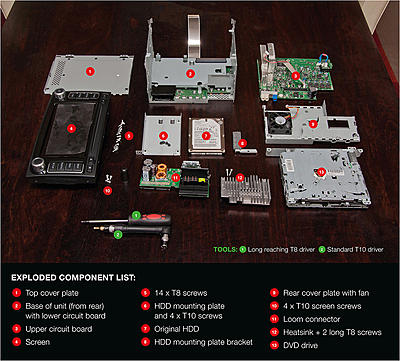
Exploded Component Overview:
STEP 1

Make sure the area you work in is clear of dust. Have some soft foam padding ready for when you remove the screen. Avoid anything that creates lint.
- Remove 2 x T8 screws from top of unit
- Remove 2 x T10 screws from side of unit. There are only 4 of these T10 screws in the job. Dont mix them up with your other T8 screws.
- Repeat step 2 for the other side.
STEP 2
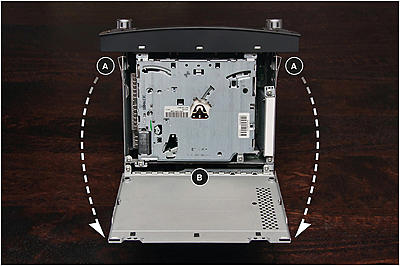
Remove top cover plate by pulling up at point (A) and work the hinge at point (B).
STEP 3
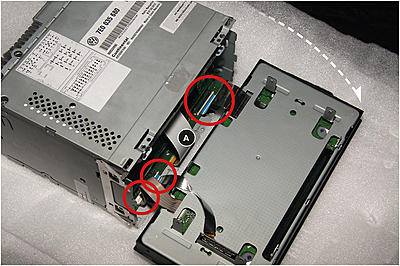
Carefully drop screen down as shown. The screen is connected with data ribbon in 3 locations. Pull the beige ribbon locks outwards to release the ribbon. There is no need to disconnect the DVD drive ribbon (A). Move the screen in foam aside while you do the rest of the job.
STEP 4
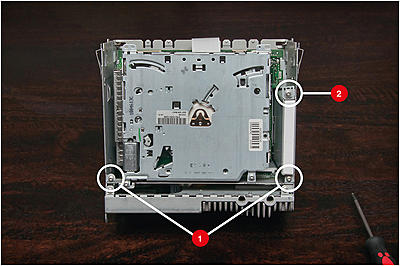
- Remove 2 x T8 screws from DVD drive mounting bracket. Aternatively, you could undo the 2 T8 screws that mount the DVD drive to the bracket.
- Remove the 1 x T8 screw which secures the HDD mounting bracket to the exterior cover.
STEP 5
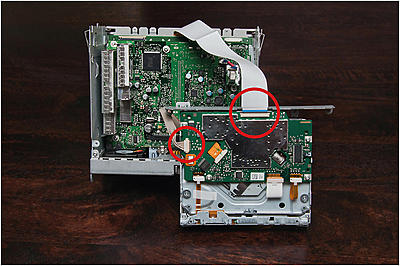
Lift out the DVD drive, and flip it over to access the 2 ribbon locks. Unplug both ribbons as you did in Step 3.
Last edited by kamold; 27-02-2015 at 03:14 PM.
Reason: Added pics back in which had expired
Tags for this Thread
 Posting Permissions
- You may not post new threads
- You may not post replies
- You may not post attachments
- You may not edit your posts
-
Forum Rules
|
|


 Reply With Quote
Bookmarks