Support VWWC

Page 1 of 2 12 LastLast
Results 1 to 10 of 20

Thread: The CC Story

  1. #1
    Join Date
    Jan 2019
    Location
    Johannesburg, South Africa
    Posts
    23
    Users Country Flag

    Post The CC Story

    This is the story how the Golf MKV R36 came about.
    Here's the link Golf R36


    When the Golf 7 GTI came out, a few years back, I was in two minds in getting it.
    After doing some thinking I thought I would go down a different route and do something away from the mainstream.
    The prices of new cars are getting a bit ridiculous here in South Africa and also I wanted something more exclusive, which the Golf 7 GTI won't really give me that.


    So at that time I decided to get a Golf MKV R32, which was more exclusive, since there's not many of them around here in South Africa. I think it was just under 400 sold here. Also we didn't get the Golf MKIV R32.
    Eventually got a very decent one. Was happy with it.


    I was toying around on turbo charging it and was leaning towards a twin turbo setup to try to reduce the lag.
    But that "being very exclusive thing" kept popping into my mind and realized that there are some turbo'd R32 here in South Africa.


    Then the idea popped into my head, why not a 3.6 VR6 aka the R36.
    Found that the VR6 3.6 motors are pretty rare in this country. Have been looking for one for over a year without any luck.
    I even got pricing to get one from oversea but is was pricey anything from R60000.00 (AUS$6000) and upwards. That's excluding shipping, customs and other costs.


    I also realized that when getting the engine, from scrap yard/oversea/etc..., what condition would the engine be in. Then there's that wiring harness, the ECU and any other items that you need to get together.
    Also, me being picky, I wanted the engine that has the BWS engine code, not the BHK, BHL, BLV, CNNA, etc... The BWS is the engine code that was used for the R36 Passat that came out in Europe and in Australia, so it's more authentic.


    That's when I got the idea to just go and buy the car that has that engine in, at least I'll know the condition of the engine and have all the important items.
    Well here in this country (South Africa), with my research, I could only find one vehicle that will have the BWS engine code and that would be the Passat CC (2009-2012) 4Motion or the VW CC (2012-2017) 4Motion.
    The other vehicles like the Porsche Cayenne 3.6, Touareg 3.6 and most properly the Audi Q7 will have the 3.6 VR6 but on some of them they'll have the lower horsepower (280Hp) rating but a higher torque (380Nm) rating than the BWS engine horsepower of 300Hp and 350Nm.
    The plan was to get the car, strip out the engine, gearbox, engine wiring harness, the ECU and replace it with the R32 engine and then sell it.


    Well to get one 4Motion CC was a waiting game, since they are not that popular here. I didn't want a later model one since the price will be high and a lot of money would be wasted.
    It was more than one and a half years later I got one for a steal and the only second one that popped up during my time in searching. The price was so low that I thought there was something major wrong with it.
    The funny thing is that a VW Master Car dealership was selling it in a town called Pietermaritzburg, about four hours of drive away.
    When I first inquired about it they told me it was sold, but then they phoned back two days later indicating that the car was available if I was still interested, which I was.


    It was the VW CC 2012 VR6 3.6 4motion Reflex Silver with 120000Kms on the clock. The price was perfect, the year was perfect and it being a facelift from the Passat CC, will help the my selling price after the engine swap.


    Here's it whilst on holiday.


    The VW CC was essentially a facelift from the Passat CC, just some cosmetic changes.
    Did the paperwork here JHB, explaining to the Pietermaritzburg VW dealer that if I'm not happy with the car, when I get to finally see it, I'm not going to sign anything, and drove down to Pietermaritzburg.
    Well got there on a early Friday morning and had to wait for the car since they said they are busy putting new tyres on it, Michelin Sports 3 mind you.
    Saw the car and was over the moon. Really nothing wrong with it, Kessy key setup, seat massager, seat fans, auto parallel park, auto reverse park, the real tyre pressure monitor with pressure readings, etc...
    It went well and the interior was well looked after, with the exception of a couple of cigarette burns on the drivers side carpet and it was a one owner.
    Still to this day I'm wondering why the price was so low.
    That was almost three years ago, 2016.


    With my Red MKV GTI I had plans to do the 4motion conversion with the DQ500 gearbox.
    Then a few months later a tragic event happened in my family and the plans for both projects was put on hold and quickly sold the GTI.
    In that same year I went down to the South Coast for a break, I used the CC. That's when I fell in love with it, the missus also likes it.


    Then I start to have ideas to keep the car but still do the 3.6 engine swap.
    The one idea was to get a diesel motor for the CC and the missus can drive the car around and use it when we go on holidays.
    Then using the idea of getting the CC for the 3.6 motor I decided to go to auctions to look for an accident damage CC that has the diesel motor.
    I would need the diesel engine, the engine wiring harness, the ECU, the gearbox, the fuel(diesel) tank, back suspension and few other bits and bobs.
    Over the few months there were too many serious accident damage diesel CC donors for my liking to do a decent swap, until I saw one that was in a heavy side smash.


    The engine compartment was untouched, looks like the back suspension may have missed the heavy damage and the fuel(diesel) tank was okay. A perfect candidate for the swap.
    But I lost the auction bid. The winning bid had to pay in the total amount of R166000 (AUS$16600) (Auction buyers commission and document costs included). At that time there were two diesel CC with the same year, selling on AutoTrader. One for R180000 (AUS$18000) although it had a high mileage and the other one for R188000 (AUS$18800). So why not just pay slightly higher for a non accident damage vehicle, which was running perfectly.
    With my research to get the prices to replace the damaged parts, all from VW, that was around R160000 (AUS$16000) and that excludes any panel beating and spray work.
    So really not sure how some people mind works.


    After this I started to rethink my idea of the diesel engine replacement. I was thinking that once the diesel engine swap was done to the CC, for my missus, I would need to get a turbo project car, like what I've done to the Red MKV GTI. The idea was to get a Golf MK6 R and almost go nuts on it. But that exclusive thing came into my mind again.
    Why not get a 2L TSI turbo for the CC, the CC also came out with the 2L TSI motor, same one as the Golf MK6 GTI.
    Good idea and I can keep the 4Motion on the CC.
    So the hunt for an accident damage 2L CC at the auctions started.


    Soon I found one. It's a strange accident. Looks like the vehicle flipped from the front nose and onto its roof. No airbags were deployed.
    But most importantly no damage to the engine, gearbox (DSG) and the drive shafts.
    Joined the auction to do the bidding. Only two of us bidded on the car and I won the bid.


    Here's the photos of the auction 2L CC. This is the Passat CC 2012 model pre facelift.


    If you're behind, you're slow. If you're in front, you're in my way.


  2. #2
    Join Date
    Jan 2019
    Location
    Johannesburg, South Africa
    Posts
    23
    Users Country Flag Thread Starter
    As you can see that the aircon radiator was a bit smashed up.

    Unfortunately right were the boost pipe clips onto the intercooler plastic pipe, that intercooler plastic piece is cracked which renders the intercooler useless.

    The radiator is in perfect shape. No coolant leakages at all and still has the original coolant.

    Quite a bit of oil coming out of the boost pipe from the turbo side.It is expected since the car was on its roof and the oil just leaked from the engine to everywhere.
    There's even oil in the exhaust.


    Installed the battery to start it again.

    This time is to find out why the engine sound like it was running on three cylinders.

    The car started at the auction, although it wasn't running that great with a huge amount of smoke screen, the car did run on all four cylinders.
    When the car was delivered to me I saw that a coil pack was missing and I used my spare RS4 coil pack.
    Did find a faulty coil pack which I replaced.

    I proceeded to rev around the 3500rpm for a while to clear out the oil out of the cylinders and exhaust.
    After a short while it stopped smoking altogether and idle as it should.
    Also drove it up and down the road slowly and the motor sounded fine and the DSG acting as it should, so really pleased with it. I cut my knuckles on my right hand badly since the windscreen was smashed inwards and the windscreen was only a couple of centimeters from the steering wheel.

    I did find some VW invoices in the car, while I was cleaning out, and on the one invoice I see that the timing chain tensioner was replaced with the updated version, including the timing chains, guides, etc... This motor is the same one as the Golf MK6 GTI (CCZB engine code 155Kw). The CC was also subjected to that tensioner failure problem.
    The CC had 116000 kms on the clock.

    The motor/gearbox is dirty and needs a decent cleanup before I do any further work.


    Nice and clean.


    This is the back right (driver side). Notice the tyre rubber wrapped around the axle.

    Not really sure what happened to the car, but looks like some sort of a blowout, lost control, went down a steep embankment and once reached at the bottom it must have flipped onto the roof from the front. There's no side damages whatsoever, so it did not roll either the left or right side onto the roof.

    The tyre rubber that I pulled from the back axle.
    If you're behind, you're slow. If you're in front, you're in my way.


  3. #3
    Join Date
    Jan 2019
    Location
    Johannesburg, South Africa
    Posts
    23
    Users Country Flag Thread Starter
    The ECU


    Used a dremel to cut the slits into the anti theft bolts and used a large flat screwdriver to loosen them to remove the ECU.


    The ECU ready to be couriered to Cape Town for the immobiliser delete.
    Since the VW CC came from the Passat family the ECU immobiliser doesn't talk to the instrument cluster like the Golfs do, otherwise I would have used the smashed CC instrument cluster. The ECU talks to the convenience module. Also I couldn't use the smashed CC convenience module since that module is the "normal" key setup (non keyless system) and my CC has the Kessy (keyless system).


    While the ECU was sent away I stripped out the turbo and sent it to a company called Fastec, for a thorough inspection.
    Really nothing was wrong with it. Still was in a excellent condition and passed all their tests .
    Nice clean turbo back from Fastec.


    With the turbo installed and installed the ECU that had the immobiliser delete done.
    Engine dirty again, just dusty, as it stood for a few weeks.

    The engine started with no problems. At that stage it seems the ECU immobiliser was done properly, but the real test is to come once the engine is installed in my CC.

    Drove the car into my garage to strip out the engine.


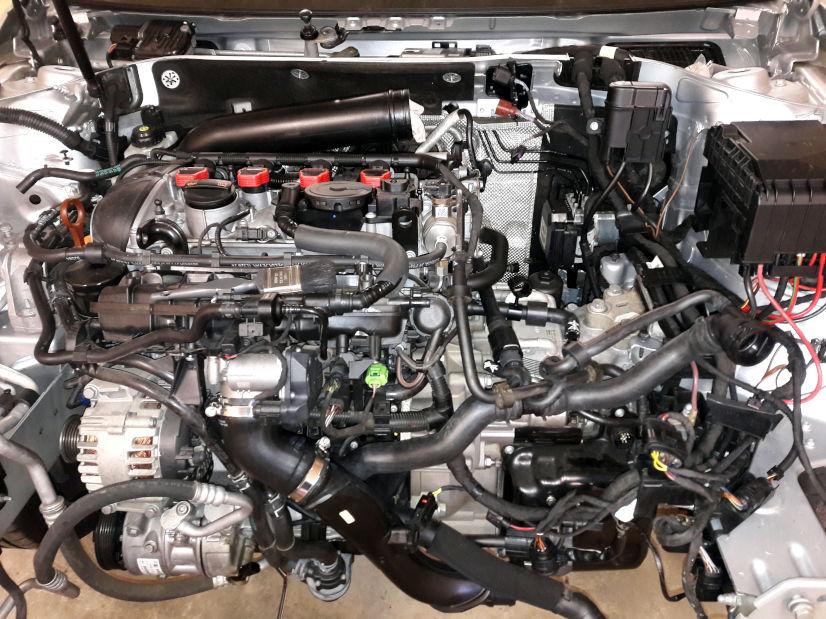
    Moving the engine out the CC engine bay.


    Now this gives me an opportunity fix and replace certain items, like replacing the two coil pack plugs on the right.
    Who ever stole that one coil pack just ripped the electrical plugs off without unclipping them first.
    They also damage that coil pack wiring harness cover.


    Cleaned the dust off the motor.

    Notice that the turbo is not so nice and shiny anymore.

    Taking out the pins from the coil pack plug.


    Ready to receive the new original electrical plugs.


    The new plugs on.


    Decided to just replace that infamous PCV valve for just incase.

    The new one on the left.


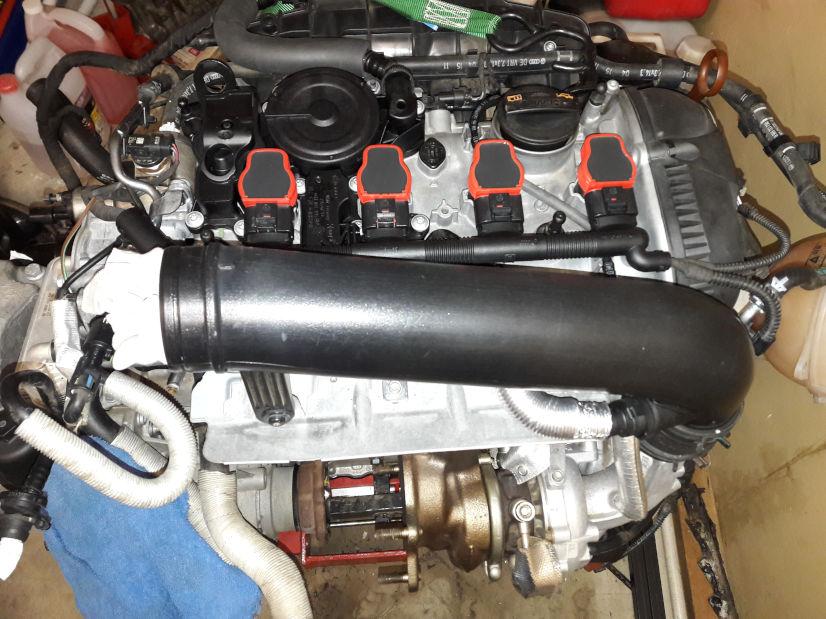
    Installed new spark plugs and of course the RS4/RS8 coil packs.
    Also replaced the broken coil pack wiring harness cover.
    There was another plug the was also broken which was replaced.


    Completed everything that needed to be done on the motor and it's ready to be installed into a new home.
    If you're behind, you're slow. If you're in front, you're in my way.


  4. #4
    Join Date
    Jan 2019
    Location
    Johannesburg, South Africa
    Posts
    23
    Users Country Flag Thread Starter
    The front bumper and headlights stripped off from my VW CC VR6 3.6 4Motion.


    The nose is really dirty and the CC shows that is has done a lot of dirt road travelling.

    The front section completely off. Almost ready for the motor and gearbox to come out.


    Before the motor gets pulled I need to disconnect certain wiring.
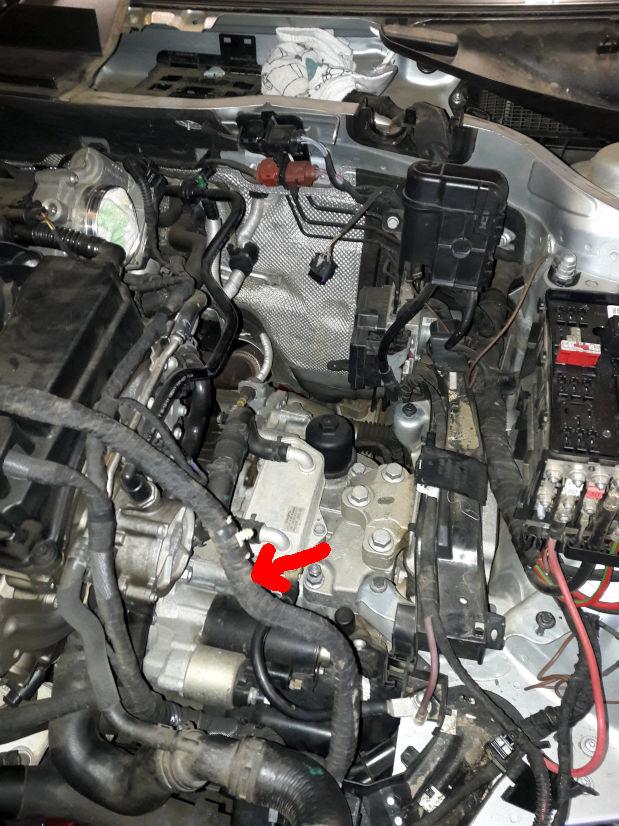
    This is the feed from the alternator (red arrow) which needs to be removed from the fuse box.


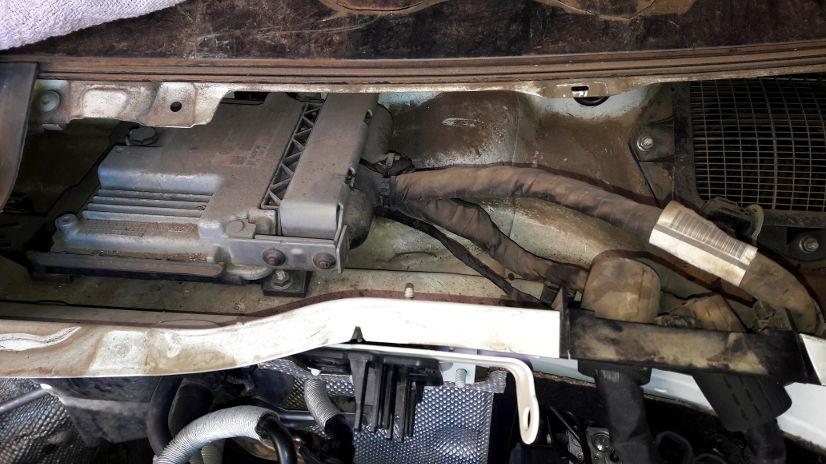
    The ECU with the engine wiring harness which also needs to be disconnected and removed (red arrow).


    Using the dremel to cut a slot into the anti theft bolts, so I can un-tighten them with a big flat screwdriver.


    The ECU and the engine wiring harness (red arrow) removed from the body.


    Pulling out the VR6 3.6 motor.
    In a way it was a bit sad. I did 30000 Km on the CC which I enjoyed every Km.
    At that time I was wondering how the four cylinder two liter would perform. What would the throttle response be like?


    The empty engine bay.


    Before installing the 2L motor I did some heavy cleaning in the engine bay.


    Once the cleaning process was completed in the engine bay the next step is to start on the wiring changes.
    It is easier to work on the wiring without the engine in the engine bay. You don't need to lean over the engine to get to the ECU plug, where the most of the wiring changes will happen, if the engine was installed.

    On the ECU there are two plugs.
    One is a 60 pin plug which is the engine wiring harness.
    This wiring harness goes to the engine to the spark plugs, injectors, throttle body, valves, sensors, etc...
    There are a couple of wires that branch off from the engine wiring harness to the body VIA connectors.
    The other plug is a 94 pin plug which is the body wiring harness.
    This wiring harness goes to the body to the Lambda sensors, accelerator, fuel controller, etc...

    On this 94 pin plug is were the most of the wiring changes needs to be done.
    With the MED17 ECU for the two CC, I would expect the the 94 pin plug pin assignment would similar between to two petrol versions (2L 3.6L) since this is going to the body.
    But no it's not. It is totally different. I had to swap the pins around in the 94 pin plug to their proper places.
    I happy to say that no wire was cut, spliced, stripped, nicked, etc... when I completed it. Can revert it back without any problems.
    All the wires that I didn't need I sealed it and taped it away.
    I used the original VW web insulation tape.

    This is the 94 pin plug for the ECU, which is partially stripped.


    Stripped out the plugs from the main plug housing. It wasn't really necessary since you can still take out the pins while in the plug main housing.


    You can see the short plastic pins (red arrow). This is in place were there are no wire.
    The reason for this is to provide a seal from the elements to the ECU pins from dirt and moisture.
    The thick orange silicon band (green arrow) around the plug is the sealing unit.
    At each pin position there's a small hole that the wire is fed through. This causes a seal.
    If there's no wire then that small hole is open to the elements which will cause corrosion to the ECU pins.
    If no wire is used then that short plastic pin (red arrow) is used to provide a seal.


    Now the problem comes in once you need to move the wires around on the plug. Those short plastic pins are part of the top cover of the plug.
    If you need to move the wire to the position that had no wire before and it has that short plastic pin then you need to break that off from the top cover.
    Once broken off you can't use that short plastic pin. You need to get this type of pin to replace the previous wire position to provide a proper seal.
    It's the two longer plastic pins on the left. The three short plastic pins are the broken off pins from the plug cover which can't be used.


    The longer plastic pin that is used once you've moved a wire out of a position and that position will have no wire in it.
    This longer plastic pin simulates the wire and the pin at the end of the wire. It gets inserted in the same way as the wire into the plug.


    The plug that has the longer plastic pin insert. Notice the black plastic pins sticking out of the plug were there used to be a wire.
    If you're behind, you're slow. If you're in front, you're in my way.


  5. #5
    Join Date
    Jan 2019
    Location
    Johannesburg, South Africa
    Posts
    23
    Users Country Flag Thread Starter
    Before I started on the wiring change, I studied the wiring differences between the two CCs to get an understanding what needs to be changed.
    Once I got an understanding I started to mark out the 2L and the 3.6L pinouts of the different plugs into an Excel spreadsheet.
    From there I marked out from what pin it needs to go out to which pin or added new wires. Triple checked everything.
    Once I done all the changes to the wiring I also triple checked everything. I also used the multimeter to check the wiring changes.


    All the pin swaps completed.

    Notice the wires that were left out. Those wires were not needed. For example the VR6 has four lambda sensors and the 2L has only two lambda sensors.

    The wires which are not needed I've sealed them off and taped them up.
    I used heat shrink.


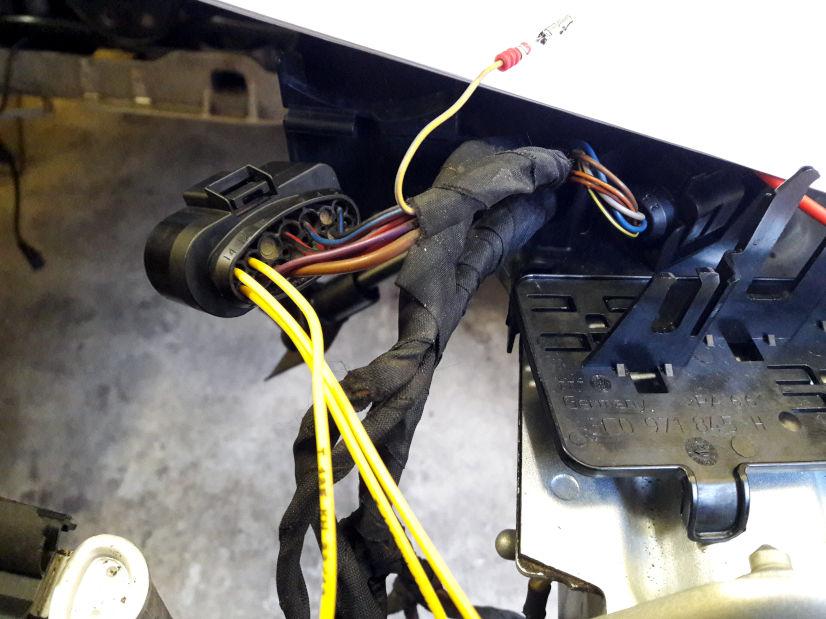
    One of the other plugs, that plugs into the engine wiring harness, need additional wires for the MAP sensor.
    The VR6 hasn't got a MAP sensor, but the 2L turbo has.
    I used the VW repair wires. All VW repair wires are in yellow, round about 30 to 40 cm long and have pins on both sides.
    Also you need to get the wire seal as well. There is a little silicon grommet that goes around the top part of the pin.
    It seals out the dirt and moisture from the plug.


    The plugs that are not used I bought the opposite side plug and inserted blank sealing grommets.
    This way I don't have to cut off the plugs since I did not want to cut any wires on the CC.
    These two plugs will go to the two lambda sensor plugs that are not used.


    The ECU 94 pin plug all taped up and plugged back into the 2L ECU.

    Now I can install the 2L engine.
    If you're behind, you're slow. If you're in front, you're in my way.


  6. #6
    Join Date
    Jan 2019
    Location
    Johannesburg, South Africa
    Posts
    23
    Users Country Flag Thread Starter
    The engine installed.


    My cat Sniffels inspecting the turbo and he wasn't pleased with the size, it needs to be bigger.


    Later on my other cat Patches also inspected the turbo. She was also disappointed with the turbo size.


    But both were happy with the installed RS4/RS8 coil packs


    Installed the engine support bar.
    Going to drop the subframe and the gearbox.


    Subframe out.


    Removing the gearbox.


    The engine support bar doing its work, while the gearbox is out.


    Removed the dual mass flywheel.


    You guys are wondering why the gearbox and flywheel was removed.
    There's nothing wrong with the gearbox or flywheel.
    The reason is, because of this:
    If you're behind, you're slow. If you're in front, you're in my way.


  7. #7
    Join Date
    Jan 2019
    Location
    Johannesburg, South Africa
    Posts
    23
    Users Country Flag Thread Starter
    As indicated earlier on I indicated that I wanted to do something away from the mainstream, so on the CC I want to do a big turbo but that will be further down the road.

    With previous experience in breaking gearboxes and other people breaking the DQ250 gearboxes I decided to get the DQ500 DSG gearbox.
    The DQ500 is the seven speed gearbox. The same one that the Audi RS3 has.
    It's not the seven speed DSG gearbox (dry clutch) or DQ200, that's in the Audi 1.8 and the VW/Audi 1.4. Those are ***** boxes by the way.
    It is the seven speed DSG gearbox (wet clutch) that can handle between 500Nm to 600Nm depending on the stock software it has.
    With DSG tune the stock clutches easily handles 800Nm.

    The gearbox is a straight bolt on, but you need to get the driveshafts, flywheel, the starter and the gearbox selector lever cable as well.
    Also the round electrical plug needs to be changed, that plugs into the the gearbox.
    And that's basically it.
    So if you have a DQ250 DSG and going for big power just slap on the DQ500 with changes and off you go.
    If you used the diesel box then you would need to do the gearbox software since the box will change at diesel rpms just above 4500 rpms.

    It was a few months before I started this project that I started to look for a DQ500.
    Here in South Africa there are basically three main models that you can get the DQ500 for the 4WD.
    That is the 2L Tiguan 4Motion, 2L Audi Q3 Quattro and the Audi RS3.
    The Tiguan and Q3 comes in either the petrol or the diesel variety. The diesel is more a common variety.

    It it was literally the last weekend that I was about to give up in searching for the DQ500, thinking that I can do the search later on and then do the install when the big turbo project happens, that I struck gold and more gold.

    Went to the scrap yard that I've been a few times and asked if there are any gearboxes from the Tiguan, Q3 or the RS3 4wd.
    One guy said no. There was another person said that we should check on another shelf and as luck would have it there was the DQ500 hidden at the bottom of the shelf right at the back.
    Few gearboxes had to be dragged out to get to it. The person exclaimed that this gearbox has been there for over three years when he looked at the asset number tag on the gearbox. I have been to that scrap yard a few times asking for the DQ500, which they say no they don't have.
    Also the gearbox casing seemed to be a bit shiny. The oil cooler was missing but that's not a biggie.
    I don't see any damages or nicks on the gearbox.
    It came from a Q3 2L diesel.
    Then I asked if they have a rear diff, which the answer was no. But then again someone else indicated that they just received a vehicle a couple of hours ago that will have the diff I'm looking for.
    So we went out to view the vehicle. I was excited when I was it was a Audi Q3 2L Quattro diesel still standing on it's four wheels.
    Walked around and there was no hint of an accident. Saw the interior was a bit stripped. Looked in the engine and saw some signs of a fire.
    Looked like is small fire, so I wasn't too concerned. Told them that I want the gearbox/transfer case, the front side shafts, the back diff with it's side shafts, including the other gearbox/transfer case that we found under the shelf.
    Got all the items at an excellent price.

    Was told that they need about a day or two day to do the paperwork, since they just got the vehicle and another two days to strip out the parts.

    On the day that I came to pick up the parts, I was told that I could take the whole back suspension, with the diff in it without any extra costs.
    Was very happy about it because the back wheel bearing housings were aluminum. That can onto the new R36 since the (R32) back wheel bearing housing are metal.
    Also saw that the front suspension had the aluminum wishbone on it, thought about the R36 again since the (R32) had metal wishbones, and asked them how much for it.
    They told me I can just take.

    Here's my booty:
    Here's the gearbox from the fire damaged Q3. Notice some fire damage on the cover of the Mechatronics.


    The other Q3 diesel box that was found under the shelf.


    The front subframe with the suspension, disks, calipers, etc...


    Slight damage from the fire.


    The aluminum wishbone that I wanted, but got the whole front suspension.


    The full back suspension with the diff and the starter lying on top of the red lid container.


    The back aluminum wheel bearing housing.


    Unfortunately they damaged the front driveshafts. More about it later on.

    When doing the DQ500 swap from the DQ250 you have to swap out the flywheel.
    The DQ250 flywheel on the left and the DQ500 on the right.


    The DQ250 flywheel weight


    The DQ500 flywheel weight


    The DQ500 flywheel installed and torqued.

    Notice the red marks by the bolts.
    That is to mark that the final half turn was done. As soon as I've tightened a bolt that you need to turn by 90/180/etc... degrees I immediately mark it, so if I get interrupted for any reason I'll know what bolt/nut has been done or not.

    Now it is ready to receive the DQ500 gearbox.
    If you're behind, you're slow. If you're in front, you're in my way.


  8. #8
    Join Date
    Jan 2019
    Location
    Johannesburg, South Africa
    Posts
    23
    Users Country Flag Thread Starter
    I used the DQ500 gearbox that was in a slight fire.
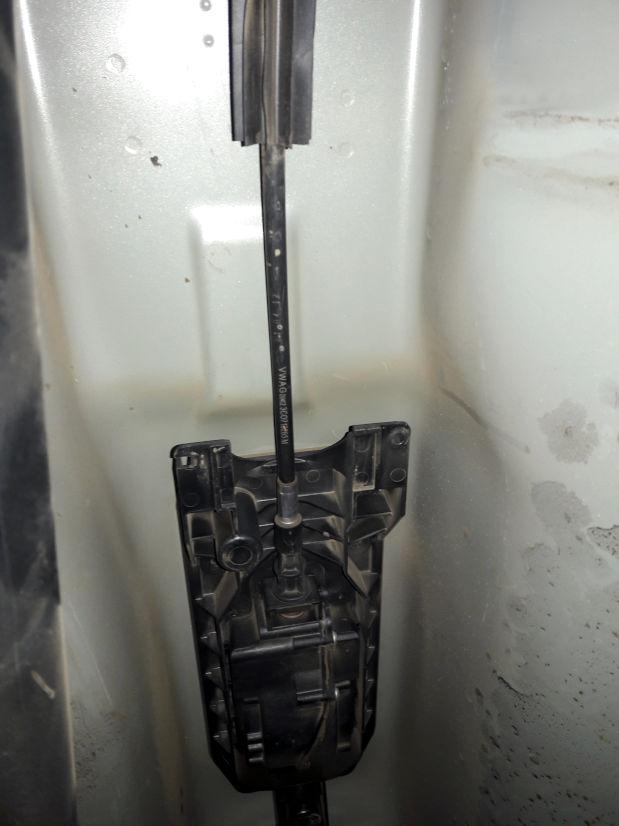
    Once installed the DQ250 gearbox selector cable does not fit. It's a bit short and the mounting bracket is also different.

    Unfortunately you cannot just buy the cable from VW.
    You have to buy the gear lever selector box with the cable.
    But the scrapyard had one.

    To swap out the gear lever selector box the prop shaft needs to be dropped.
    The selector box (black) just above the prop shaft.


    The gear lever selector box with it's cable for the DQ250.

    Notice that there are no nuts/bolts holding it to the body.
    Around 2010/2011 and above, some bright spark at VW decided to change the fasting positioning from the bottom side to the top side.

    Now you have to strip out the whole center console just to get to the two nuts to unbolt the gear lever selector box.


    Swapped out the existing and installed the other one so the cable can fit onto the DQ500 gearbox.


    The heat shield that is above the prop shaft.


    The heat shield between the exhaust pipes and the prop shaft.


    Once the gearbox is in I need to do the electrical plug swap to the gearbox.
    The DQ250 has a 20 pin socket and the DQ500 has the 16 pin socket.
    The top plug is for the DQ500 and the bottom is the DQ250 plug.


    Removing the pins out of the DQ250 plug.
    I had to make a makeshift tool to release the pins.
    It's a very thin wire that came from a stainless steel brush.
    I flatten the one end a bit and the other end I made a hook for a grip.
    That was my pin remover tool.


    All the pins removed from the DQ250 plug and is ready to be installed on the DQ500 plug.


    Installed the pins onto the DQ500 16 pin plug.
    Notice the leftover unused pins. That will be sealed and taped away.


    The white blanking grommets to seal the plug from dirt and moisture.


    Another change when installed the gearbox was some of the radiator pipes that lead to and from the gearbox oil cooler.
    Since the positioning of the oil cooler and the direction of the inlet/outlet is different I had to get two sets of radiator hoses.
    Had to cut them up a bit to make them fit 100%. Unfortunately I don't have more photos on this. Only the one.

    The top pipe is the original from the CC and the bottom one is a new pipe set for the Tiguan.
    Notice the pipe the Tee's off towards the bottom.
    That pipe goes to one of the oil cooler outlet.
    There's also another pipe set for the other outlet.

    With the gearbox all connected up I was ready to connect the battery.
    I did run into a bit of a problem, but more of that later on.
    If you're behind, you're slow. If you're in front, you're in my way.


  9. #9
    Join Date
    Jan 2019
    Location
    Johannesburg, South Africa
    Posts
    23
    Users Country Flag Thread Starter
    Once the gearbox was installed and all the electrical work was done I almost spent a whole weekend double/triple checking the wiring.
    The last thing I want is to see smoke.

    Connected the battery, no smoke, switched on the ignition, no smoke. So far so good.

    I hooked up the VCDS, cleared out all errors.
    I switched off the ignition, turned it back on again and used the VCDS to scan for errors again.

    My main interest area was in the ECU (Engine), TCU (Gearbox) and the ABS.
    I could communicate with the ECU and TCU which was good news.
    The ECU had a couple of errors due to some sensors that wasn't connected, which was normal since those sensors weren't connected at that time.
    No errors to indicate that there was a problem.

    Now since the ECU was from a front wheel drive I need to tell it that needs to be in a 4 wheel drive mode.
    In VCDS, in the coding section, there's a place that you can tell it if it's a fwd or 4wd.
    But, as expected, the ECU did not allow the 4wd coding. I helped with another conversion for someone a couple years back, MKV GTI manual to DSG 4wd conversion, and I had the same result.
    I just need to update the ECU with the 4wd software.

    There are errors from the ABS unit complaining about the ECU.
    It's got to do that the ABS expects the ECU to be in a 4wd mode, which currently the ECU is in fwd mode.

    Checked the TCU and found no errors which was also good news.
    Since I was itching to know how many kms the gearbox has done, I went into the measure group that will display how many kms the gearbox has done.
    It showed that the gearbox has done just other 25000Km. So still pretty newish.
    The gearbox was manufactured in May 2013 and the code is NZS.

    Now the next step is to start it.
    Tried to start it but it's saying that I need to move the gear selector into neutral or park position.
    It doesn't matter if the gear lever is in neutral or park it kept saying I need to move the gear selector into neutral or park position.
    I checked the gearbox wiring again. Everything seems to be connected in the right place.

    I used the VCDS to view the ECU and the TCU measuring blocks that displays the gear lever selector position.
    Both control units do display the proper gear lever positions.
    But something is not allowing the ECU to start the engine.

    I used a multimeter to check the voltages on certain pins on the gearbox.
    Found one pin that had a floating voltage. It was floating around the 6-8 volts, so I suspected that there was something wrong with the electronics on the mechatronics unit, although no errors showed.
    Since this gearbox came out of a Audi Q3 that had a small engine bay fire.
    The vehicle may had the ignition on while the fire was there and may have shorted something out in the electronics section of the mechatronics unit in the gearbox.

    Since I've an extra DQ500 gearbox I decide to make an extension cable that will reach the other DQ500 gearbox.
    Was a bit too lazy to swap the gearbox out and I really want to rule out certain things.


    Disconnected the plug from the gearbox, shoved the wires into the plug and plugged the makeshift extension the other DQ500 gearbox.
    With the VCDS I could communicate with the gearbox.

    Tried starting and this time the motor fired immediately. It idled smoothly.
    That was a great relief and I was overjoyed.
    Also the immobiliser delete was done properly on the ECU.
    Blipped the throttle a couple of times and the engine responded to it.

    Heard no funny noises from the gearbox.
    I wanted to put it into Drive and let it go through the gears, but decided against it since I don't have the driveshafts on yet.
    I couldn't let the engine run it too long since there was no coolant and no exhaust, so I switched off.

    Before disconnecting the makeshift gearbox plug I was really interested what was the mileage on the other DQ500 gearbox since it looks fairly shiny and clean.
    Also the gearbox was manufactured in July 2015 and the code is QYQ.
    Looked at the measuring group that displays the distance travelled.
    It showed that the gearbox only travelled 3840kms. That's basically brand new.
    The "new" gearbox that will replace the other one.


    That's the gearbox that was hidden under the scrapyard shelf for three years. It was waiting for me to pick it up.

    I spent a couple of hours in swapping the gearbox out and also swapped the oil cooler from the other gearbox since this didn't have one.
    Once done the car starts with no problem.

    Now it's onto the next step.
    That is to install the whole front nose back on, but I also ran into a problem, which was caused by me.
    If you're behind, you're slow. If you're in front, you're in my way.


  10. #10
    Join Date
    Dec 2010
    Location
    Helensburgh
    Posts
    1,336

    What an awesome job. I always liked my 125TDI in the Skoda, it pulled like a train from down low and surprised quite a few cars. The Tiguan 140 is a dog or the few I have driven have been in comparison to the 125.

Page 1 of 2 12 LastLast

Tags for this Thread

Bookmarks

Posting Permissions

  • You may not post new threads
  • You may not post replies
  • You may not post attachments
  • You may not edit your posts
  •  
| |