Page 20 of 21 FirstFirst ... 1018192021 LastLast
Results 191 to 200 of 203

Thread: Mysticality's Light Thread!!

  1. #191
    Join Date
    Jan 2013
    Location
    Sydney
    Posts
    96
    Users Country Flag

    Quote Originally Posted by wfdTamar View Post
    Yes, the height or being behind the grill. It doesn't look like it obstructs it at all, but it might.

    Friday night through windy wallaby country it doesn't have any spot effect at all to speak of, but really just amplifies the pattern of the standard lights on high beam. Not useless, but I'd like a bit more spot effect like that Rigid one with a narrower beam pattern probably would have.

    Just got a set of these for $225 shipped (using code JULY4TH). Expensive but supposed to be Canbus friendly. It actually mentions Golf V so should be no problem.

    50Watt H7 Canbus HID set

    H7: Morimoto Elite HID System - HID Systems from The Retrofit Source Inc
    You might still experience a flicker when high beams are on :-

    Vagcom shutters off and look at turning up headlight voltage to 13v

    Sent from my C6903 using Tapatalk

  2. #192
    Join Date
    Apr 2009
    Location
    Northern Tasmania
    Posts
    480
    Quote Originally Posted by NOO63N View Post
    You might still experience a flicker when high beams are on :-

    Vagcom shutters off and look at turning up headlight voltage to 13v

    Sent from my C6903 using Tapatalk

    They come with an anti-flicker capacitor (in fact I think by mistake I ordered two kinds of them). Not sure if that's to deal with that issue but for that kind of money I'd be wanting them to work perfectly.

    I think these do the same thing, just slightly differently:

    Low Beam: 9006/HB4 - Relay Harnesses from The Retrofit Source Inc

    Can-Bus: Morimoto Standalone - Wire Harnesses - Components

    P.S. After talking to them turns out I ordered the anti flicker capacitor, but shouldn't have. It's handled by the Canbus harness they supply.

    Pics when it gets here.
    Last edited by wfdTamar; 17-07-2015 at 04:51 PM.
    2008 Skoda Octavia Elegance TDI 4x4 wagon
    Bluefin 132Kw/385Nm, Racechips Response Control, Haldex Performance controller, H&R anti roll bars, Koni FSD shocks, SuperPro control arms & ball joints, subframe & gearshift mods, Full Dynamat interior, Polk Audio sound, Columbus, Bluetooth, MDI, parking sensors, camera. BBS SR 18x8" w/ 225/40xR18. 3M Crystalline tint.

  3. #193
    Join Date
    Jan 2013
    Location
    Sydney
    Posts
    96
    Users Country Flag
    Had something similar, was more so caused by the drop in current when high beams where on...you never know though. Morimoto is very quality so I would expect the same!!

    Sent from my C6903 using Tapatalk

  4. #194
    Join Date
    Apr 2009
    Location
    Northern Tasmania
    Posts
    480
    Ok, here's an install of the Morimoto HID set from theretrofitsource.com currently US$150 plus shipping (US Post US$27.69 with option for insurance). That's currently A$242 total. So it is quite a lot more expensive than your average eBay HID kit. So here's hoping it's good and lasts ok.


    LEGAL NOTE: - of course, it is illegal to retrofit HID in a vehicle used on Australian roads if you don't also put in headlight washers (squirters) and levelling apparatus (prohibitively expensive options). Needless to say, this is an academic exercise, and not actually used on the road.


    H7: Morimoto Elite HID System - HID Systems from The Retrofit Source Inc

    Mysticality's Light Thread!!-dsc00651-jpg

    You can choose 35 or 50 watt ballasts for the same price. The 50 watt gives 20% more light, but doesn't last as long ('rated' at 3 years vs. 5 years - whatever 'rated' means. I'm not sure if that's a warranty, or expected lifetime).

    Mysticality's Light Thread!!-dsc00654-jpg

    Interestingly these Morimoto kits have separate igniters (below), whereas any other kit I've seen it's part of the ballast. It doesn't make the ballasts particularly small either, so hopefully that means longevity and quality.

    Mysticality's Light Thread!!-dsc00656-jpg

    Good video going over the parts here:

    https://www.youtube.com/watch?v=yd8jJwahsZc

    Pick from 4500K, 5500K or 6500K bulb options. Lower number is not so brilliant white coloured, but is brightest. Higher number is whiter, but not as much light (not a huge difference though). I got 4500K and found them to be like original equipment Xenon (HID) factory equipped cars.

    For a Skoda (or any VW family car) you want the Canbus harness option (not HD Relay) and they reckon you don't need the US$15 anti-flicker capacitor link (in fact, shouldn't use it with the CanBus harness). The CanBUS harness has a length with connector (shown on the right) you won't use with our cars.

    Mysticality's Light Thread!!-dsc00652-jpg

    The parking globes look very yellow once this kit is in, so you might want to consider LED bulbs for them (which might need load resistors to work on our cars). Something like these (below) although I'd prefer some straight out aimed ones, rather than side shooters like those. The Octavia uses W5W parking bulbs.

    T10 XB LED Headlight marker turn signal interior COB bulbs blinkers T10 194

    Morimoto HD Load Resistors - Wire Harnesses - Components
    Last edited by wfdTamar; 29-07-2015 at 05:28 PM.
    2008 Skoda Octavia Elegance TDI 4x4 wagon
    Bluefin 132Kw/385Nm, Racechips Response Control, Haldex Performance controller, H&R anti roll bars, Koni FSD shocks, SuperPro control arms & ball joints, subframe & gearshift mods, Full Dynamat interior, Polk Audio sound, Columbus, Bluetooth, MDI, parking sensors, camera. BBS SR 18x8" w/ 225/40xR18. 3M Crystalline tint.

  5. #195
    Join Date
    Apr 2009
    Location
    Northern Tasmania
    Posts
    480
    Here's all the components dry assembled.
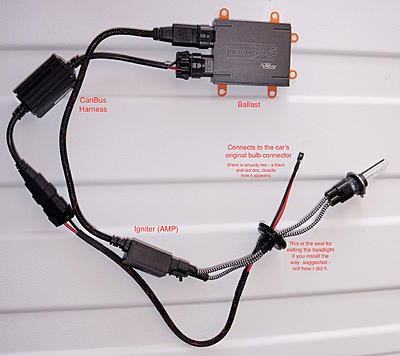
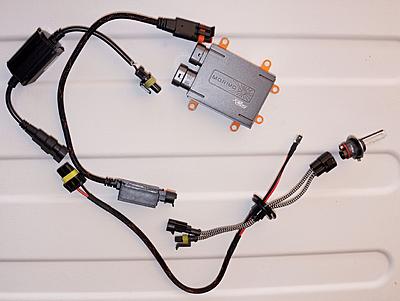
    Mysticality's Light Thread!!-dsc00663-jpg

    Mysticality's Light Thread!!-dsc00665-jpg

    To the car -

    Before you start and take the headlights out of the car, make sure to adjust them with the dashboard knob so the light is shining fully down.

    Take out the headlights - a doddle on the Skoda.
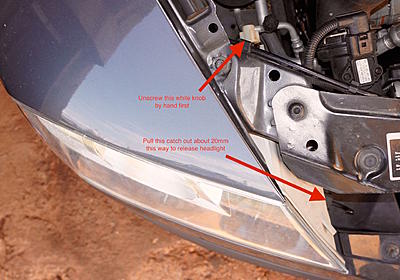
    Mysticality's Light Thread!!-dsc00668-jpg

    A gentle nudge from the rear of the light.
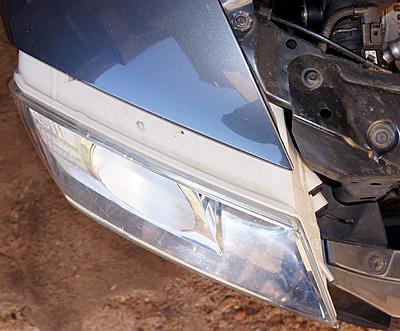
    Mysticality's Light Thread!!-dsc00672-jpg

    Swing the light out - it's still attached by the cable at the outer corner.
    Mysticality's Light Thread!!-dsc00673-jpg
    Last edited by wfdTamar; 29-07-2015 at 05:36 PM.
    2008 Skoda Octavia Elegance TDI 4x4 wagon
    Bluefin 132Kw/385Nm, Racechips Response Control, Haldex Performance controller, H&R anti roll bars, Koni FSD shocks, SuperPro control arms & ball joints, subframe & gearshift mods, Full Dynamat interior, Polk Audio sound, Columbus, Bluetooth, MDI, parking sensors, camera. BBS SR 18x8" w/ 225/40xR18. 3M Crystalline tint.

  6. #196
    Join Date
    Apr 2009
    Location
    Northern Tasmania
    Posts
    480
    Move the headlight right out and gently tip it over (so as not to scratch the paintwork) to get to the connector.
    Mysticality's Light Thread!!-dsc00674-jpg

    Mysticality's Light Thread!!-dsc00675-jpg

    Mysticality's Light Thread!!-dsc00677-jpg

    The tang on the connector only needs to move a very little bit - don't pull on the connector until you feel you have moved the tang.
    Last edited by wfdTamar; 29-07-2015 at 05:43 PM.
    2008 Skoda Octavia Elegance TDI 4x4 wagon
    Bluefin 132Kw/385Nm, Racechips Response Control, Haldex Performance controller, H&R anti roll bars, Koni FSD shocks, SuperPro control arms & ball joints, subframe & gearshift mods, Full Dynamat interior, Polk Audio sound, Columbus, Bluetooth, MDI, parking sensors, camera. BBS SR 18x8" w/ 225/40xR18. 3M Crystalline tint.

  7. #197
    Join Date
    Apr 2009
    Location
    Northern Tasmania
    Posts
    480
    Take the clear plastic cover off the rear of the light. This looks like where the factory Xenon (HID) ballast's are mounted. Unfortunately I couldn't get the Morimoto ballast, igniter & Canbus to fit inside it.

    Mysticality's Light Thread!!-dsc00679-jpg

    Mysticality's Light Thread!!-dsc00681-jpg

    Mysticality's Light Thread!!-dsc00683-jpg

    Now - the instructions on the site say for a light like this to drill a hole in the casing of the headlight (or for this headlight, the clear cover). This is because you connect to the car's original bulb connector, then out through the casing of the headlight to the Canbus, ballast, then through the igniter, back through the headlight casing, inside to the HID bulb. That leaves a lot of stuff outside the headlight visible and subject to the under bonnet environment.

    This means you have to mount all the bits one side of the round silicone seal on the harness, outside the headlight somewhere (the ballast, igniter, Canbus) - like on the outside of the headlight, but somewhere that won't interfere with installing the headlight in the car! Or maybe in the cavity behind the headlight. There is room there, but not many good mounting points. It would be a bit of a bodge.

    You possibly could do it and leave something unplugged while putting the headlight back in the car then plug it in (tricky).

    Mysticality's Light Thread!!-dsc00684-jpg

    Mysticality's Light Thread!!-dsc00685-jpg
    Last edited by wfdTamar; 29-07-2015 at 05:47 PM.
    2008 Skoda Octavia Elegance TDI 4x4 wagon
    Bluefin 132Kw/385Nm, Racechips Response Control, Haldex Performance controller, H&R anti roll bars, Koni FSD shocks, SuperPro control arms & ball joints, subframe & gearshift mods, Full Dynamat interior, Polk Audio sound, Columbus, Bluetooth, MDI, parking sensors, camera. BBS SR 18x8" w/ 225/40xR18. 3M Crystalline tint.

  8. #198
    Join Date
    Apr 2009
    Location
    Northern Tasmania
    Posts
    480
    So I thought - there's a fair bit of room inside the headlight - stick it all in there! Now if this was your average eBay HID kit this would be easy, as the ballasts are pretty small and that's about all there is to them beside a bit of wiring. However the Morimoto kit has chunky ballasts and a couple of extra bits (the CanBus and Igniters). You also need to keep the projector (the brown thing) clearance to move up and down by the levelling motor and also for headlight aiming adjustment.

    So the ballast just squeezes past the projector then has plenty of room on the floor of the headlight.

    Mysticality's Light Thread!!-dsc00697-jpg

    The trickiest bit is getting the ballast in past the projector. Before you start and take the headlights out of the car, make sure to adjust them with the dashboard knob so the light is shining fully down. This raises the rear of the projector up for maximum clearance to get the ballast in. It is still really tight getting the ballast past the projector. This was the best angle. Be careful, there are some delicate, expensive plastic bits in there. Break something and you'll be looking at a good few hundred dollars for a new headlight.

    Mysticality's Light Thread!!-dsc00694-jpg

    The CanBus can be zip tied here.

    Mysticality's Light Thread!!-dsc00704-jpg
    Last edited by wfdTamar; 29-07-2015 at 04:44 PM.
    2008 Skoda Octavia Elegance TDI 4x4 wagon
    Bluefin 132Kw/385Nm, Racechips Response Control, Haldex Performance controller, H&R anti roll bars, Koni FSD shocks, SuperPro control arms & ball joints, subframe & gearshift mods, Full Dynamat interior, Polk Audio sound, Columbus, Bluetooth, MDI, parking sensors, camera. BBS SR 18x8" w/ 225/40xR18. 3M Crystalline tint.

  9. #199
    Join Date
    Apr 2009
    Location
    Northern Tasmania
    Posts
    480
    I held the ballast and CanBus in place with zip ties. Measure down from the lip of the headlight opening, inside the headlight, to the back of the ballast (which is actually at the front of the headlight), to work out the point to drill through the floor of the headlight. Then use that measurement on the outside of the headlight floor to mark that point. I just went by sight to mark where it was side to side (of the ballast). You'll need another hole between the two connectors on the ballast - it needs to be the length of the ballast body away from the first hole.

    Mysticality's Light Thread!!-dsc00702-jpg

    The zip tie starts outside the headlight floor, furthest away from the headlight opening, in through that first hole made, the up over the ballast between the connectors through the hole to outside the headlight again, then do the zip tie up.

    Mysticality's Light Thread!!-dsc00703-jpg

    Here's how the CanBus is done.
    Mysticality's Light Thread!!-dsc00710-jpg
    Last edited by wfdTamar; 29-07-2015 at 04:58 PM.
    2008 Skoda Octavia Elegance TDI 4x4 wagon
    Bluefin 132Kw/385Nm, Racechips Response Control, Haldex Performance controller, H&R anti roll bars, Koni FSD shocks, SuperPro control arms & ball joints, subframe & gearshift mods, Full Dynamat interior, Polk Audio sound, Columbus, Bluetooth, MDI, parking sensors, camera. BBS SR 18x8" w/ 225/40xR18. 3M Crystalline tint.

  10. #200
    Join Date
    Apr 2009
    Location
    Northern Tasmania
    Posts
    480

    Then you can connect the car's original plug to the HID wiring spade connectors (the red and black ones). It doesn't seem to matter which goes where (I mean the red or black). I slid the silicone round seal towards this to give some protection to the slightly exposed terminals on that connector just so when it's tucked inside it doesn't cause problems. Fold up all the HID wiring and ignitor carefully and tuck it into the clear cover and it just pops on.

    To protect the weather tight headlight I just dabbed some silicone sealant over the holes made for the zip ties.

    There you have it. Only a few little drill holes marring the headlight. All weather protected. Looks neat.

    Put the lights back in the car then test them. I found the Coming Home/Leaving Home function was a bit more laggy, possibly not working at all (though it seems ok now). Maybe I just wasn't accounting for the slight delay with HID lights. Theretrofitsource said it could be due to a low voltage battery. It is mid winter, so that could be it.

    You very likely will need to re-aim your headlights - at the very least you can lower them with the dash knob more than you would have formerly. Be careful with this as you don't want to be a nuisance to other road users - but then you won't be using them on the road - as that is illegal - right?

    One thing I noticed inside the headlight is there is a shutter over the low beam projector, which means on high beam the low beam acts as high beam too (as well as the high beam bulb). This means you have HID high beam as well as low beam.

    Absolutely no complaints from the car - bulb out warnings, CanBus errors, flickering etc. Precise cut off above the low beam just like before (due to the shutters in the projectors).

    So is it worth it? Well, the original low beam is pretty good on the Octavia. High beam is ok, but I want better. I was considering some kind of driving lights and/or a light bar. Tried a light bar and was not very impressed (though if I mount it differently that may improve). Really tricky mounting driving lights on the Octavia because the bonnet goes down so low at the front and moves a bit forward when it opens. So any lights have to mounted forward quite a way.

    I'll post some comparison shots soon showing how these lights go with fixed camera settings.
    Last edited by wfdTamar; 29-07-2015 at 05:23 PM.
    2008 Skoda Octavia Elegance TDI 4x4 wagon
    Bluefin 132Kw/385Nm, Racechips Response Control, Haldex Performance controller, H&R anti roll bars, Koni FSD shocks, SuperPro control arms & ball joints, subframe & gearshift mods, Full Dynamat interior, Polk Audio sound, Columbus, Bluetooth, MDI, parking sensors, camera. BBS SR 18x8" w/ 225/40xR18. 3M Crystalline tint.

Page 20 of 21 FirstFirst ... 1018192021 LastLast

Bookmarks

Posting Permissions

  • You may not post new threads
  • You may not post replies
  • You may not post attachments
  • You may not edit your posts
  •  
| |