Results 1 to 10 of 260

Thread: A long time coming, Rob's 4motion turbo build!

Hybrid View

Previous Post Previous Post   Next Post Next Post
  1. #1
    Join Date
    Sep 2009
    Location
    .
    Posts
    298
    Thread Starter
    I believe so. The reason i believe they've put the immo defeat on my original ecu is because they've written on the ECU's what they've done to them.

    My standard one has written on it "12-01-10 stock ecu" and "12-01-10 C2 Immo Defeat"

    My spare one to be used for the turbo software has "12-01-10 C2 stg3 24v 630cc 4"maf"

    Thus i am thinking they thought the ecu i wanted re-flashed with the tune was my original ecu thus they didnt need to immo defeat it and that what is actually my original ecu was just a spare that i bought and thus needed the immo defeat done on that instead.

    If thats whats happened i'm a bit disappointed because i clearly marked on my standard ecu "Original ecu please dont modify / re-code" and clearly marked my spare ecu as "ecu for re-flash"
    Last edited by WhO; 31-12-2010 at 01:42 AM.

  2. #2
    Join Date
    Oct 2008
    Location
    Townsvegas QLD
    Posts
    466
    Users Country Flag
    have you tried the ECU yet. Chris is pretty straight fwd!
    SLAM.POKE.TUCK.DROP.DOPE!

  3. #3
    Join Date
    Sep 2009
    Location
    .
    Posts
    298
    Thread Starter
    I havent been able to since the cars in many pieces! Oh well on the up side if the ECU does need to go back to C2 i guess i can take the opportunity to get the SAI and Cat deleted from the software!

    Edit:

    Chilled out a bit now, Called C2 today and although i couldnt speak to chris as he's out of the office till next week the guy i spoke to thought that both ecu's had the immo defeat performed on them. I'm still confused as to why they would've immo defeated my standard ecu but oh well as long as the second one has been done that all that matters. Still, i'm looking forward to chris's reply to my e-mail to confirm this but things are looking up again.

    Hopefully the SRI intake and head spacer arent too far off so i can get things cracking on

    If it wasn't 41 degrees today i'd pull the gearbox off and get that done... oh well, more procrastinating!
    Last edited by WhO; 31-12-2010 at 08:34 AM.

  4. #4
    Join Date
    Sep 2009
    Location
    .
    Posts
    298
    Thread Starter
    Time for an update?

    Well i got down and dirty a couple nights ago with the bora and off came the gearbox!

    Followed this guide VWVortex.com - Transmission Removal Clutch Replacement diy Quick Version and its pretty much spot on. Note that when seperating the transfer case and gearbox you can expect a flood of transmission oil to spill out. I'd recommend draining the box before doing this to save getting covered in oil... doesnt taste great

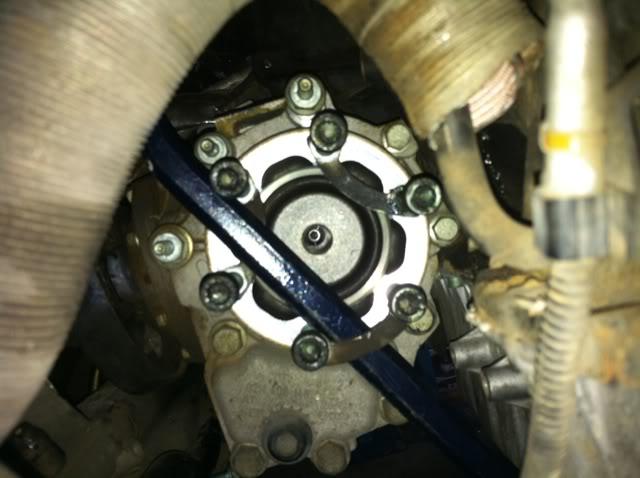
    Two of the trickiest bits was manouvering the gearbox off after unbolting it and also getting the 6mm allen bolt from out of the transfer case, although not hugely tricky just frustrating (the one buried deep in the drivers side driveshaft, step 21 in the vortex guide) Initially i bought several allen key extension shafts however i broke all 4 that i bought!!! In the end i ended up making my own by welding a 6mm hex head with a drive adapter to the threaded rod from a spring compressor... Believe me, this one will NEVER break!

    For removing the gearbox personally i would recommend using an engine hoist to support the engine or having an engine support brace like seen here http://www.lonestarminiclub.com/gall...0/DSCN0648.JPG
    It's not completely necessary, the Vortex guide uses a jack to support the engine, however in honesty its not hugely stable like that and could easily slip out of the drivers side mount, especially when your rocking the gearbox / engine assembly to get the bastard out. So between an engine to the face or 5 minutes rigging up my engine crane, i decided on the safer option!

    Upon getting the box off i was pretty happy to see the clutch seems quite new. Even though its going to be replaced it means that the rear main seal didnt just look new, it probably is. I'm not a fan of replacing rear mains when they're not leaking as sometimes they then leak! Luckily this means somebody else has risked changing it and won. The dual mass flywheel also looks to be in good nick, not rattly and smooth. Again this is also going though as i have a lightened chromoly flywheel and carbon ceramic clutch to go on

    For getting the box back on i'm actually almost contemplating dropping the motor, there really doesnt look like theres much left attached to it other than some cooling lines and a couple wiring looms and being rigged to the engine crane means it might only take an extra 10-20 min vs wrestling a gearbox for the better part of 30m-1hr! Hrmmm decisions decisions.

    Next steps from here is to order in the seals for the trans - transfer case, pull the sump to weld in a oil return, put the new clutch on and after that just paitiently wait for my intake, head spacer and a few other bits from C2. Might give them a call monday their time to assess where they're at. Once i've got the final bits from them i'll hopefully have it all running within 2 weeks

    I'll update this with pics shortly when i get home from work

    Pics:

    The damnn 6mm hex buried in one of the shafts


    The broken extensions


    The solution


    Safety first!


    Happy days

    Last edited by WhO; 10-01-2011 at 12:36 AM.

  5. #5
    Join Date
    Jun 2008
    Location
    Cronulla, NSW
    Posts
    941
    Users Country Flag
    Quote Originally Posted by WhO View Post
    Once i've got the final bits from them i'll hopefully have it all running within 2 weeks
    2 weeks? you're the friggin' man, i love this build. but we do NEED pics. I can't wait to see this.

    Would you be ok with a visit one day when she is running? I'd love to swing by and take a look, cause i've been trying to get the missus and baby down to the Barossa anyway for a weekend so might fit well.
    MY02 Bora V6 4Mo|Matte Black plastidip|VTDA|R32 Exhaust|R32 dampers and springs|TT pedals|R32 steering wheel|17" 8L S3 rims|R32 sways|Blue Haldex|EBC reds

  6. #6
    Join Date
    Oct 2008
    Location
    Townsvegas QLD
    Posts
    466
    Users Country Flag
    Gabes DIY is pretty handy. I have the clutch alignment tools if you need to barrow them. Are you going to replace the throw out bearing assembly.If so will with a syringe it make the bleeding a little bit easier.(I also have a power bleeder to u want to barrow) Also when you disconnect the slave cylinder make sure the o-ring stays on the end of the nipple or you may not get a good seal when you put it back in as it super hard to push in since the o-ring is still in the tranny(TO bearing assembly line). Also it would be a good time to clean up the tranny and engine bay since you have less stuff in the way. Keep up the good work and let me know if you have any questions.
    Cheers J
    SLAM.POKE.TUCK.DROP.DOPE!

  7. #7
    Join Date
    Sep 2009
    Location
    .
    Posts
    298
    Thread Starter
    Quote Originally Posted by Dyldo View Post
    2 weeks? you're the friggin' man, i love this build. but we do NEED pics. I can't wait to see this.

    Would you be ok with a visit one day when she is running? I'd love to swing by and take a look, cause i've been trying to get the missus and baby down to the Barossa anyway for a weekend so might fit well.
    Realistically once i've gotten the last few bits from C2 its just a mater of bolting everything up and fabbing up an exhaust and the rest of the cooler piping, maybe i'm being ambitious but we'll see! At this stage i have no idea when they'll get the rest of my gear out but hopefully soon *fingers crossed*

    Definitely welcome to come past if your in Adelaide at any point mate, just let me know in advance and we can organise a time!

    Quote Originally Posted by Mr. JLT View Post
    Gabes DIY is pretty handy. I have the clutch alignment tools if you need to barrow them. Are you going to replace the throw out bearing assembly.If so will with a syringe it make the bleeding a little bit easier.(I also have a power bleeder to u want to barrow) Also when you disconnect the slave cylinder make sure the o-ring stays on the end of the nipple or you may not get a good seal when you put it back in as it super hard to push in since the o-ring is still in the tranny(TO bearing assembly line). Also it would be a good time to clean up the tranny and engine bay since you have less stuff in the way. Keep up the good work and let me know if you have any questions.
    Cheers J
    Thanks for the offer mate, the clutch kit i got from the US included an alignment tool so i'm pretty sorted there. I did get a new slave cylinder and was thinking along those lines, just need to find a syringe. A while back i made a power bleeder from a garden pressure pack and a spare master cylinder cap so i'm also sorted there, it's a bit ghetto but it works well! Again many thanks for the offer though I'll definitely look out for the o-ring, didnt cross my mind so you might have saved me a bit of heartache!

    Thanks for all the advice and support guys! Hopefully it all comes together like planned!

    Uploading photos now from the other day's work, sorry if they're a bit blurry, might get a few fresh ones in the daylight!

    I'll also add a few photos of the bits and pieces ready to be bolted on
    Last edited by WhO; 10-01-2011 at 12:34 AM.

Bookmarks

Posting Permissions

  • You may not post new threads
  • You may not post replies
  • You may not post attachments
  • You may not edit your posts
  •  
| |